Thursday, December 04, 2008

Stepping backwards

---------------------------------
Edit: July 2nd 2010: Disabling commenting on this post because owners of Chinese spam sites like to post links here...If you want to talk motorcycles, use the mail form on the side bar, or comment on another post. If you want to post Chinese a spam link, then please 其他地方去

---------------------------------

Quick update...

My family was down to one car, I started grad school, and my full-time job was going through a very frantic period...So my XS400 was seeing *a lot* of commuting duty. Luckily, it has been a very warm winter, so I was pretty happy on my XS400, even on chilly 25-degree mornings (if I wore my thermal bicycle tights under my jeans).

Then, the bulb in my cafe seat's tail light burned out. Since I was doing a lot of commuting at night, and since my XS's new commuting role made it nice to sometimes take passengers, I put the stock seat and giant, super-bright, and silly looking stock tail light back on.

Today, we finally got our first heavy snowfall here in Colorado...so I won't be riding the XS for a while. Luckily, we recently got a second car, so at least I have transportation for the winter! Unluckily, the second car will have to be the focus of my mechanical creative energy for a while. I don't really mind as long as I can get grease under my fingernails for something cool...I just don't expect any major XS mods any time soon.

End of the comment form

I'm taking the comment form off of this page because 90% of the times people post a comment, it's a spammer. If you want to get in touch with me, post a real comment and I'll respond.

Thanks!
-Andy

Sunday, September 21, 2008

Seat is finished -- Pictures!


The seat is done! I've had a bad cold so I've been riding the motorcycle to work every day this week instead of taking the bicycle. Check it out!

I never took home economics...but I *really* like sewing -- mostly outdoor gear, bicycle gear, and motorcycle upholstery. I'm pretty satisfied with how my seat cover turned out...I think it looks only semi-amateur ;-)

Saturday, August 09, 2008

Seat progress

OK...more progress in the boring saga of the cafe seat.

1. I got my tail light and license plate bolted to the back of the cafe seat. It looks good and works well.

2. I have the seat securely bolted to the frame. This involved drilling holes and welding nuts to the underside of the seat supports and drilling corresponding holes in the seat itself. This actually worked great -- both to hold the seat down, and to remind me of what a crappy welder I am. Luckily, the welds aren't visible and just need to tack down the nuts so I can bolt the seat on. I should remember this part of the project the next time I start dreaming about welding something structural or beautiful, though.

3. I made a pan for the seat cushion by laying fiberglass over the seat cushion area of the tail, and then trimming this fiberglass panel down. This worked great EXCEPT for the fact that I put a layer of shrinkwrap over the seat to keep the new pan from sticking to the tail. Fiberglass epoxy resin dissolves shrink wrap. I really should have used tinfoil instead. Luckily I got the new panel off after it had hardened into its final shape, but before it fully cured and became hopelessly stuck to the tail. Unfortunately, the melted shrink wrap means that I'll have to repaint the tail. No big deal, though.

The pan does securely snap over the tail section, though.

4. I took three layers of Wal Mart camping pad and glued them to my new seat pad pan with DAP Weldwood. They adhered great. I roughly cut them to shape and rode to work this morning.

The seat feels awesome, and the bike is a blast to ride again.

Now All I have to do is sand down the pad to the perfect shape, sew a seat cover for the pad, and repaint the tail. Then, I think I'll be able to FINALLY call this never ending project complete!

I'll post pictures sometime.

On a side note, I really haven't been that compelled to ride my xs400 lately. We're down to one car, which pretty much just sits at home, and I've been riding my bicycles everywhere. I have one that can take both of my kiddos and six bags of groceries, and I have another one with fat tires and fenders that's fast and unstoppable. I just haven't been able to justify taking the motorcycle, even though it will have significantly higher "pose factor" after I finish the seat.

However, for a fast blast to work on this Saturday morning, the xs400 was really great. I think having the xs400 and working on it makes me happy like having a hotrod project would...but it's a lot cheaper, easier to re-paint, and leaves enough room in my one-car garage for us to fit our car and my wife's Vespa.

Tuesday, July 22, 2008

Episode XVIII: A New Hope

This seems like the zillionth post about my cafe seat.

But, last night I checked it out, and I do have new hope. First, after removing my tail light, there is ample clearance between the cafe seat and the wheel when the suspension is bottomed out:

Photobucket - Video and Image Hosting


Photobucket - Video and Image Hosting


I also found that I still have plenty of clearance if I mount my tail light and license plate to the back of the seat. Here it is (dangling by the wires) -- check out the clearance!


Photobucket - Video and Image Hosting


Photobucket - Video and Image Hosting


And I don't think that looks too goofy.

I'm not quite ready to give up. I might even start working on fabricating a pad soon.

Saturday, July 19, 2008

The Tale of Two Seats: The Good, The Bad, And The Fugly

I finally got my cafe seat mounted...and I have to say it looks darned

good!


Getting the seat to this point was really involved. My goal was to keep everything reversible, so I could go back to the stock seat if I needed to.

First, I unbolted the outer rear fender, tail light, and seat mounts. Then I bolted two pieces of flat stock longitudinally across the frame. I was able to bolt the front piece to the stock front seat mounting holes, but I had to drill a couple of holes to mount the rear piece.

I then bent up a piece of steel to hold the tail light and license plate. I drilled holes in this piece to mount it using the inner fender mounting bolts and the turn signal mounting studs. I spliced a Molex connector to the tail light wiring (using solder and shrink wrap, of course), and was able to retain the stock tail light wiring plug in the harness. I hooked up the tail light to the mating Molex connector, and wrapped the whole thing in flex loom:


I then covered the bike with tin foil, wax paper, and newspaper, and epoxied three sheets of fiberglass over the box formed by the pieces of flat stock. I then epoxied this fiberglass box to the underside of the cafe tail. When the whole mess cured, it made the cafe tail fit exactly over the pieces of flat stock, which were solidly mounted to the bike.

Unfortunately, the front of the seat was too wide -- each front corner protruded out from the gas tank by a half inch, so I used my jig saw to taper down the sides, and laid up new fiberglass edges.

After all that was done, I filled the gaps between the edge of the outer seat and the edge of the internal fiberglass box with bondo, sanded it down a zillion times, put on primer, rubbed it down with rubbing compound, put on a couple of coats of Rustoleum gloss black, and a couple of coats of clearcoat -- each with a rubbing compound session in between.

So, it was looking hot. I was feeling pretty proud of myself, so I decided to ride it to work...then I found out about the

bad


You see, I'm cursed with being a "measure once, cut twice" kind of guy...here's a picture I took after I got home from work, pulled off the shocks and chocked up the rear wheel:


Yeah...I know. Let me tell you - this definitely made for some interesting noises, and quite a "pucker moment" when I hit the first set of train tracks on my commute. On the plus side, I made it home in one piece.

So, I thought that maybe I should replace the outer rear fender and mount the tail light on that...unfortunately, that raised up the rear of the cafe tail so it was no longer located by the piece of flat stock, and looks downright

fugly:


So, what to do?? I might pull the outer fender and shocks off again and check to see how much clearance I have for the tail without a tail light. If it is ample, then maybe I could still run the seat with a side-mount license plate/tail light or something.

When I rode it with no pad, I have to say that the experience wasn't all I had hoped for -- I kept imagining the fiberglass mounting box delaminating from the seat, so I kept not really using the bum-stop, and instead used all my back muscles to stay near the front of the seat. I think I'll bolt the seat, the mounting box, and the underlying pieces of steel stock together before I ride it again.

Also, I didn't have any padding on the seat yet...this (combined with my lack of confidence in the bum stop), caused me to slide forward and back on the seat -- I ended up holding onto the handlebars with my pinkies and ring fingers, and working the hand levers with my index and middle fingers -- just because I needed more grip not to slide off the back of the seat!

Also, I was at least three inches lower than I sat on the stock bike, which is pretty low already.

Also, the lack of padding made my eyeballs buzz like my mirrors (at least it seemed that way, but maybe that was related to the startling, gut-wrenching grinding noise that pulsed through the bike when I'd hit a major bump and the rear wheel would rub the license plate bolts).

A lot of these problems will be solved once I build a pad for the seat...but I have to say that I'm feeling pretty discouraged with the whole project. Too bad the seat makes the bike look so darned hot!
Thursday, May 08, 2008

Cafe Seat

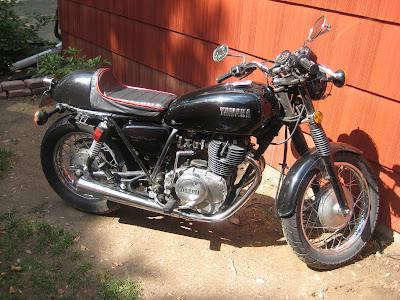
I just can't get into how the "custom" seat on my XS400 looks...I really like the look of 1950s road race bikes. My wife thinks I'm crazy for going on and on about replacing the stock seat...I think, for her, listening to my opinions on the subtleties of motorcycle seat aesthetics is like listening to the microscopic details of haircut styles is for me.

Anyway, I finally bit the bullet and ordered a sweet road race tail from and cafe tail light from Hotwing Glass. I still need to cut it down to fit and make a mount for it, but I put it on just to see how it would look.

Before:


After:


(I've been riding a fair amount -- hence the generally filthy state of the bike)

I was a little worried about my order because I just sent a paypal payment to some guy in Florida who happened to have a site that showed some cool pictures of motorcycle parts for the most reasonable prices I've come across...but he shipped the parts quickly and they're great!

I'm a little hesitant to cut the seat to length just yet...because, well, I've been thinking about getting a bigger bike. My XS400 handles great with the bronze swing arm bushings, tapered roller steering head bearings, and fork oil changed to Bel Ray 5wt...but I think it's just too light to feel really stable in a cross-wind at speeds above 60 MPH. It has no problem getting to that speed, but it's pretty easy to get blown around.

I've been focusing on counter-steering and relaxing in major crosswinds at speed and that has helped a lot...but I think a substantially heavier bike might help too. My XS400 is great for zipping around the city, but I'd also like a bike that would be easy to do cross country trips on.

So, I'm thinking about getting a 1978 Suzuki GS750 with a GSX750 16 valve engine that I found on Craigslist that needs a lot of love...and the cafe seat would look awesome on that (although I admit I'd have to make a pretty substantial pad to make the cafe seat comfortable enough for a day-long ride). We'll see if it works out.

Either way...I think my XS400 is great. We'll see if I end up keeping the xs400 and continuing to modify it, or if I'll start a GS750 blog instead :-)

Wednesday, December 05, 2007

New Photos

Here it is after all the work I've done recently:


I really like how the gaiters look.

I got the headlight stone guard for $10 on ebay...It came in a pair, in a dusty package. They were originally NOS 1970s rally car accessories. It was kind of tricky to mount -- they came with mounting clips for car headlight mounting brackets, not for motorcycles. I had to bend the clips to fit, but they were hardened so they would snap before they would deform. After snapping a couple of clips, I ended up heating them up with my MAP gas torch until they were red hot and let them cool slowly. They then bent easily. Then I heated them until they were red hot again and quenched them in water so they were hard enough to hold the stone guard on without deforming.

I think the stone guard and gaiters look pretty cool together.

Steering Head Bearing (Crossreference!)

I swapped out the roller steering head bearings with tapered roller bearings. It wasn't a very difficult job.

Surprisingly, the back of the bearing box contained a fitment chart. I thought I'd publish the info for anyone who might consider performing a fork swap on an XS 400 (like, um, Future Me).

Bikes with the same size steering head bearings as Yamaha SOHC XS400 bikes:
Suzuki
79-81 RM100, 79080 RM125, 79-80 RM250, 79-80 RM400
Yamaha
84-85 FJ600, 74-76 RD200, 73-75 RD250, 73-75 RD350, 76-79 RD400, 84-85 RZ350, 80-82 SR250 Exciter, 87 SRX250, 72-82 TZ250, 81-83 XJ550 Maxim, 81-83 XJ550 Seca, 76-77 XS360, 77-83 XS400 & Maxim, 82-83 XT550, 95-07 XV250, 88-90 XV250 Route 66, 83 XV550 Virago, 87-99 XV535 Virago, 83 YTM200 EK, 84 YTM200 EL, 85 YTM200 ERN, 83 YTM200K, 84 YTM200L, 85 YTM200N, 85-86 YTM225 Tri-moto, 83-84 YTM225 DXL, 86-90 YX600 Radian

I'm really stoked about getting it out on the road to see if all fo these changes have improved the handling.

Fuel Petcock

I got the universal fuel petcock I mentioned in a previous post from the local motorcycle shop for about $15. Unfortunately the universal mounting blank was a ridiculous $27. All it is a 1-inch by 3-inch by .25-inch, chrome plated, bronze bar with a 3/8 NPT threaded hole in the middle.

For $27, I can buy a bronze bar, a 3/8 NPT tap and matching 37/64" drill bit and have money left over. Plus, I'll be able to thread everything in the house to accept 3/8 NPT fittings >:-). I don't think I'll be too sad if my fuel petcock mounting bracket isn't chrome plated.

Right now my bike is out of commission with the fuel tap off...it was surprisingly nerve wracking to run the tank completely out of fuel. I'd like to actually fix the petcock before I fill it with fuel again.

Bronze swing arm bearings

I installed the bronze swing arm bushings. The parts from Mike's XS were a perfect fit and easy to install. I can't wait to take it out and see if they made a difference!

I'm glad that Mike's XS is around!

Oil Leak Fixed

I had a mysterious oil leak from behind the left engine cover, but I couldn't figure out where it was coming from. I finally removed the cover, chain, and sprocket, coated the side of the engine in baby powder, and fired it up. It became clear pretty quickly that the oil was leaking from the output shaft seal:


I ordered a new seal from Bike Bandit for $7.50 and installed it. The old seal got damaged from the removal, and the new seal was pretty stubborn about going in. I got it in in the end, though.

Hopefully I won't "mark my territory" whenever I park for multiple hours now!

Fork Oil Change

I changed the fork oil a few weeks ago and installed some fork gaiters.

I had to pull the fork legs to put the gaiters on, but it really wasn't a big job. However, with the fork legs removed from the bike, I had a hard time getting the fork springs out.

To remove the fork springs, you have to compress a cap in the top of the fork and remove an internal circlip that holds the spring in.

The problem was, it took a fair amount of force to compress the cap, and I had a really hard time figuring out how to keep the cap compressed while I pried out the circlip, working solo. Finally I ended up doing it by putting the fork legs back on the bike, removing the handle bars, putting my beat up "garage broom" through extremely loose handle bar clamps, wedging a tool (a 12-point internal wrench in this case) between the broom handle and the fork cap, and slowly tightening the handle bar clamps until the cap was compressed. The pictures below might help explain better (click for a larger view):


Farther Away

Closeup


After doing that, the rest of the procedure was easy. I can't wait to take it out and see if it made any difference.

Shock Update

My Harley shocks arrived. They are the right length, but they don't fit because the eyelets are too wide (if measured perpendicular to the diameter). I tried to show what I mean in the picture, but it's kind of hard to see (click for a larger version):


This is problematic on the bottom because the shock is held on by a stud, which isn't long enough to stick through the shock eyelet and thread a nut on...but the stud should be replaceable...the real problem is at the top, because the top of the shock fits into a metal pocket in the frame, and the new shock's eyelet is too wide to fit in the pocket.

I still haven't decided if it would be better to sell she shocks and get something more appropriate, or if I should try grinding down the eyelet width...I'm not crazy about either idea. In the mean time, the shocks are sitting in my garage.